

Table of Contents
- Start With the Right Fit Before You Adjust Anything
- Where Should a Pregnancy Belt Sit?
- How Tight Should a Pregnancy Support Belt Be?
- Signs a Maternity Belt Is Too Tight
- When to Wear a Maternity Support Belt
- Troubleshooting Discomfort While You Adjust
- Clothing, Skin, and Daily-Use Adjustments
- Getting Your Maternity Support Belt Covered and Delivered
- Frequently Asked Questions
Last Updated: October 17, 2026
Start With the Right Fit Before You Adjust Anything
A maternity support belt only works when it starts from the right size and shape.
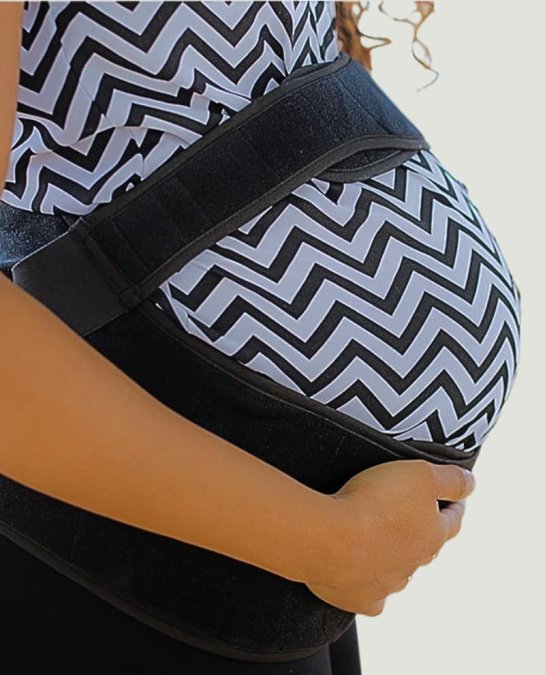
A maternity support belt is a wide, adjustable band worn under the belly and around the hips to shift weight off your lower back and pelvic joints. It supports the bump, not squeezes it.
Most discomfort comes from fit, not from the belt itself. Get the basics right and the rest is fine-tuning.
The 60-Second Comfort-Fit Checklist
Run this check every time you put the belt on:
- The band sits below the bump, not across it
- You can slide two fingers under every edge
- No red marks or creases when you take it off
If any box is unchecked, adjust before you wear it for the day.
Put the belt on while lying down or standing, not sitting. Your shape changes when you sit, so a belt that feels fine seated often rides up the moment you stand.
Where Should a Pregnancy Belt Sit?
A pregnancy belt sits low: under the bump in front and across the hips or lower back behind. The front panel cradles the belly from below. The back panel supports the lumbar area.
Placement depends on what you’re trying to relieve. For lower back pain, the back panel should sit at the small of your back, roughly level with the top of your hip bones.
Placement by Belt Design
Each design has a different anchor point. Use these as starting positions, then follow the maker’s instructions for your specific model.
Belly band (support band)
- Anchor: front panel under the bump, cradling upward; back panel across the lumbar curve.
- Test: the front edge should sit at the crease where your bump meets your pelvis, not across the bump itself.
- Common error: pulling it up over the bump like a tube top. That lifts the belly instead of supporting it from below and adds pressure at the top of the uterus.
Pelvic support belt (SI belt)
- Anchor: low around the hips, crossing the sacroiliac joints at the back and the pubic bone area at the front.
- Test: the band should sit below the bump, roughly at the level of your back pockets. It should not ride up onto the belly.
- Common error: wearing it too high, which turns a pelvic belt into a belly band and does nothing for joint pain.
Combination belt (two-part system)
- Anchor: the lower part wraps the hips like an SI belt; the upper part cradles under the bump.
- Test: adjust the lower part first, then the upper. The two parts should overlap slightly at the sides, not fight each other.
- Common error: tightening the upper part to compensate for a loose lower part. Set the hip band first.
Back support brace
- Anchor: back panel centered on the lower spine, with straps angled down toward the hips.
- Test: the panel should sit flat against the small of your back with no gap at the top or bottom edge.
- Common error: letting the panel ride up toward the mid-back, which reduces lumbar support and can dig into the ribs.
Check Placement in Three Positions
A belt that sits right when you stand can shift when you sit or walk. Run this quick check:
- Standing: the band sits below the bump, back panel flat on the lumbar curve, two fingers slide under every edge.
- Sitting: the front edge should not press into your lap or roll under the bump. If it does, the band is too high or too loose.
- Walking: take ten steps. The belt should stay put without riding up or twisting. If it climbs, lower it and tighten in small steps.
If your belt has a model-specific fit guide, follow it over general advice. Design details like strap angle, panel width, and closure type change where the anchor points land.
How Tight Should a Pregnancy Support Belt Be?
A pregnancy support belt should feel snug, not tight. You want gentle compressive support, not a clamp. The test is simple: slide two fingers under the band. If they fit easily, the tension is right.
Tighten in small steps. Adjust one strap, stand up, and move around. Then adjust the next. Straps that use hook-and-loop closure let you fine-tune in seconds.
Over-tightening is the most common adjustment error. A belt that’s too tight restricts breathing, presses on the belly, and can cause skin irritation or numbness. If you feel tingling in your legs or hips, loosen it right away.
Signs a Maternity Belt Is Too Tight
Watch for these signals that a maternity belt is too tight:
- Red marks or deep creases that last after removal
- Shortness of breath or trouble taking a full breath
- Tingling, numbness, or coldness in the legs
Any of these means back off the tension. Loosen the straps and recheck the two-finger rule.
If discomfort continues after you loosen the belt, stop wearing it and talk to your healthcare provider. A belt should ease pain, not create it.
When to Wear a Maternity Support Belt
Wear a maternity support belt during activity, not all day. Put it on before you stand, walk, shop, or do housework.
Check Your Insurance Coverage →
Most people do well wearing it for a few hours at a time, then removing it. Your body tells you when it’s had enough.
A practical daily pattern:
- Morning: put it on before you get out of bed
- Active hours: wear it for walking, errands, and standing tasks
- Rest: remove it when you sit or lie down
Use it during pregnancy stages when your changing body needs extra support, usually the second and third trimester.
The belt is a tool for movement, not a full-time garment. Short, active wear beats all-day wear every time.
Troubleshooting Discomfort While You Adjust
Most fit problems have a simple fix, but the fix depends on the symptom. Match what you feel to the cause, then make one change at a time and recheck in each position.
| Problem | Likely Cause | Fix |
|---|---|---|
| Belt rides up over the bump | Worn too high or too loose | Lower it under the bump, tighten in small steps, recheck while walking |
| Back panel digs in | Strap tension uneven or panel too high | Loosen one side, center the panel on the lumbar curve, retighten evenly |
| Pressure on the belly | Front panel too high | Drop the band lower on the hips so it cradles from below |
| Chafing at the edges | Fabric rubbing on skin or a thick seam underneath | Add a thin smooth layer, smooth the edge flat, check skin after wear |
| Belt twists when walking | Straps not flat or closure misaligned | Re-lay straps flat, recheck the two-finger rule, adjust after meals |
| Pain not eased | Wrong belt design for the pain pattern | Try a pelvic support belt for joint pain lower down; a belly band helps bump weight |
| Tingling or numbness in legs or hips | Belt too tight or sitting on a nerve | Loosen immediately; if it persists after loosening, remove the belt and call your provider |
| Red marks or deep creases that last | Over-tightening or pressure points | Loosen, add a smooth layer underneath, recheck the two-finger rule |
| Shortness of breath | Band too tight across the ribs or belly | Loosen the upper straps, lower the band, take a full breath to confirm |
| Skin irritation or heat rash | Moisture trapped under the band | Switch to a breathable layer, remove the belt during rest, wash per maker instructions |
Fix One Thing at a Time
Adjustment is a process, not a single tighten. Change one strap, stand up, walk ten steps, and sit down. If the problem improves, stop there. If it doesn’t, undo the change before trying the next fix.
A common pattern is a belt that feels fine in the morning and uncomfortable by afternoon. That’s usually shape shift after meals or fluid changes through the day, not a broken belt.
When to Stop Wearing It and Call Your Provider
Ordinary fit discomfort, mild pressure, a little bunching, a strap that needs a tweak, is normal and fixable. Stop wearing the belt and contact your healthcare provider if you notice:
- Tingling, numbness, or coldness in the legs that doesn’t go away after loosening
- Increased pelvic or pubic pain instead of relief
- Skin breakdown, open irritation, or a rash that spreads
A belt should ease pain, not create it. If a fix doesn’t help within a day or two, the design may be wrong for your pain pattern. A belly band helps bump weight; a pelvic support belt helps joint pain lower down. Ask your provider which design matches your symptoms before buying another belt.
Never wear a belt tight enough to restrict breathing or leave marks that last after removal. If you feel tingling in your legs or hips, loosen it right away and recheck the fit.
Clothing, Skin, and Daily-Use Adjustments
What you wear under the belt matters as much as the belt itself. A smooth, breathable layer between the band and your skin cuts friction and irritation.
Try these daily-use habits:
- Wear the belt over a thin cotton layer, not directly on skin
- Choose breathable material for hot days
- Check your skin after each wear for redness or chafing
A common mistake is wearing the belt over thick seams or waistbands. That creates pressure points. Keep the layer underneath smooth.
Keep a spare set of straps or a second belt on hand for busy weeks. A clean, dry belt fits better and lasts longer.
Getting Your Maternity Support Belt Covered and Delivered
If you have Tricare insurance and need a hands-free breast pump, we handle the whole process for you. We get all the authorization from your insurance.
That means less back-and-forth between your doctor, your insurer, and a supplier.
Here’s how it works:
- Share your prescription and insurance details with us
- We confirm your coverage and complete the authorization
- We ship your breast pump and maternity back support to your door
- Shipping is free, and there’s often no cost to you
You get insurance-covered maternity support gear without the billing headaches. Check your insurance coverage with General Home Medical Supply and let us manage the paperwork.
Frequently Asked Questions
How do I wear a maternity belt so it actually feels comfortable?
Put the belt on while lying down or standing tall, then slide it low so the front panel supports under your bump and the back panel rests across your lower back. Fasten the hook-and-loop closure loosely first, then tighten each side a little at a time until you feel gentle compression without pinching. Walk a few steps and sit down once. If it digs in, shifts, or you feel pressure on your abdomen, loosen one strap and readjust. A maternity support belt should feel supportive, not restrictive, and you should be able to breathe and move normally.
How tight should a maternity support belt be?
Tight enough to lift and support your bump, loose enough that you forget it is there after a few minutes. A good test: you should be able to slide two fingers under the strap without forcing them. If the belt leaves deep red marks, restricts your breathing, or makes you feel pressure on your bladder, it is too tight. Adjust one strap at a time and recheck after standing up, since fit changes when you move. If discomfort continues, talk with your healthcare provider about whether the belt or the fit is right for you.
Can I wear a maternity support belt while sitting?
Yes, but many people loosen it or take it off for long sitting stretches. A belt designed for standing and walking support can bunch or press into your abdomen when you sit for a while. If you sit at a desk, loosen the straps slightly before you sit down, or remove the belt and put it back on when you stand. Keep the belt placement low around the hips so it does not ride up into your ribs. Check in with your body every hour and adjust as needed.
How often should I take off a maternity support belt?
Take it off for sleep unless your healthcare provider tells you otherwise, and give yourself breaks during the day, especially after two to three hours of continuous wear. Remove it to check your skin for redness or irritation, and let your skin breathe. Many people wear a belt during walks, errands, or long stretches of standing, then take it off at home. If you notice numbness, tingling, or increasing pain, stop wearing it and speak with your provider. Your fit and wearing schedule should change as your body changes.
Getting the right maternity support belt is half the battle. Getting it covered and delivered without stress is the other half. General Home Medical Supply coordinates your prescription, handles insurance authorization, and ships your breast pump and maternity back support to your home at no charge, with free shipping. Get started with General Home Medical Supply and focus on your pregnancy, not the paperwork.